Amidst the chaos of a widespread emergency, injuries will no doubt happen– but not just to the other guy. There is every possibility that, no matter how many precautions are taken, someone in your family, a friend or neighbor will be hurt and with medical help stretched thin during any disaster, assistance may be a long wait away. Knowing how to provide first aid for a range of injuries and conditions can make the difference in someone’s life until help is available.
In this four-part series, we will explore a full range of first aid techniques for treating minor wounds, burns, broken bones, preventing heat stroke and shock, as well as what to do when nature bites back. This first installment will cover minor wounds, first aid for the 3 types of burns and how to dress serious wounds. For quick reference, an item lists is included at the top of each section to help you stock first aid kits and prepare to treat these injuries.
Treating Minor Wounds and Burns
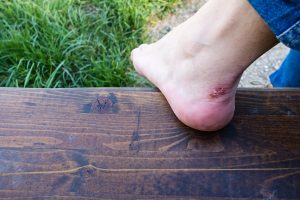
Blisters
ITEMS NEEDED:
Blister pad or band aid
antiseptic wipe
alcohol swap or lighter
pin or small knife
antibiotic ointment
adhesive tape
For a blister that has yet to burst, you will need to drain the fluid. Begin by cleaning the area with an antiseptic wipe, one any basic first aid kit carries, or at least with clean water and towel. Sterilize the point of a pin or knife with an alcohol swab or by holding it in a flame. Gently pierce the base of the blister enough to draw a drop of fluid. Press the fluid out from the opposite side, as you would with a toothpaste tube squeezing from the bottom.
Then cover with a a blister pad, the padded, adhesive dressing with a hole in the middle. If this is not available use a band aid or other dressing that will not rub the wound. Then fill the blister pad’s hole or band aid pad with antibiotic ointment. Cover with adhesive tape to hold it in place. Dress burst blisters in the same manner.
To prevent blisters on feet, always wear well-fitted hiking boots or shoes, break them in gradually. Wear moisture wicking socks or cover those friction points (heels, balls of feet) with extra padding or even a band-aid. On hands, blisters usually form along the ball of the hand. Typically, these can be prevented by wearing gloves when working.
Abrasions
ITEMS NEEDED:
Sterile gauze
soap
large adhesive bandages (optional)
adhesive tape
Abrasions are a different animal than other wounds. They are usually a product of skidding bare flesh across a harder and, typically, dirtier surface. Because of this, debris is picked up and embedded in the wound. Of course, this will need cleaning which, unfortunately, means scrubbing. So with a soaped up gauze pad or other clean wipe, clean out the wound. If it doesn’t hurt, you’re not doing it right. Rinse the wound, making sure to wash out all the soap then cover completely with a layer of gauze and tape it into place. There are also some commercially available bandages large enough to cover abrasion wounds.
Burns
ITEMS NEEDED:
Cool water source
sterile dressing
water-based burn gel (like Water-Jel)
or natural aloe vera (no greasy ointment)
ibuprofen

Immediately run cool water over the burn, immerse it or use a cool compress (soaked cloth) for about 20 minutes. For minor, first degree burns or small second degree burns (less than 3 inches), after the initial period of pain and discomfort apply aloe vera or a water-based burn gel, if available) and cover or wrap loosely with a sterile dressing. Do not… DO NOT use butter or any oily ointment as these will trap heat in the affected area and could cause more damage. A dose of ibuprofen will help with pain and inflammation. Should blisters form (a characteristic of second-degree burns) take special care to prevent blisters from bursting for as long as possible. Burns covering a large area and any above first degree should receive medical attention.
Burn Classifications:
1st degree – The least serious type of the three, affecting only the outer layer of skin and may cause:
- Pain
- Redness
- Swelling
Treat as a minor burn unless it covers large areas of hands, feet, face groin, buttocks, or a major joint at which time seek medical attention.
2nd degree – A more serious burn likely to cause:
- Pain
- Red, white or splotchy skin
- Swelling
- Blisters
A smaller burn, less than 3 inches, can be treated as a minor burn (outlined above). However if it covers large areas of the hands, feet, face, groin, buttocks or a major joint, consider it a major burn and seek medical attention immediately.
3rd degree – Third-degree burns are the most serious burns affecting all skin layers and underlying fat. These types could also reach as deep as muscle layers and bone. The burn may appear:
- Black or white and will be dry
- Have a leathery texture
- Skin will not blanch (or white) when pressed
- Generally, there will be no pain
- Seek emergency medical attention as quickly as possible for these types of burns.
Treating Serious Wounds
ITEMS NEEDED:
Sterile gauze and dressing
roll of gauze
adhesive tape
antibiotic ointment
adhesive sutures
While we all have experience dealing with our own cuts and scrapes that need little more attention than a quick cleaning and a band aid. Serious wounds are of the type that cause excessive bleeding, are comparatively larger and deeper than a typical minor cut, and most likely will require medical attention to be properly cleaned and sutured.

Begin by applying direct pressure to the wound until bleeding stops. Pack the wound with sterile gauze, continue applying pressure and elevate above the heart if possible. This may involve laying the victim down and propping up an injured leg. Do not remove soaked gauze as this could tear open any clotted areas and cause bleeding to start again. Instead, add more layers of gauze and continue with direct pressure. After bleeding has stopped for some time, carefully remove soaked gauze and gently flush with water. Dry the area around the wound. Then spread a layer of antibiotic ointment to one side of a sterile dressing and cover the entire wound and tape in place or wrap with a roll of gauze.
For open wounds in need of stitches, go ahead and press the edges together, using adhesive suture strips to keep closed. Apply sterile dressing as described above.
Watch for signs of infection indicated by:
- Increasing pain, warmth, redness, and swelling around the wound site
- An increase of pus (white and/or yellow)
- Red streaks radiating out from the wound under the skin
- Fever
- Seek medical attention if symptoms grow worse.
DO NOT attempt to close animal bites or those injuries caused by a crushing accident as these are difficult to clean thoroughly and will serve only to trap contaminants and foster infection. In these cases, pack the wound with moistened gauze, wrap in a sterile dressing and locate medical assistance.
Keep an eye out in the following weeks for the next three parts in this series when we’ll nurse sprained ankles, dive into splinting broken bones, guard against shock and learn how to prevent heat stroke and what to do when bugs bite.